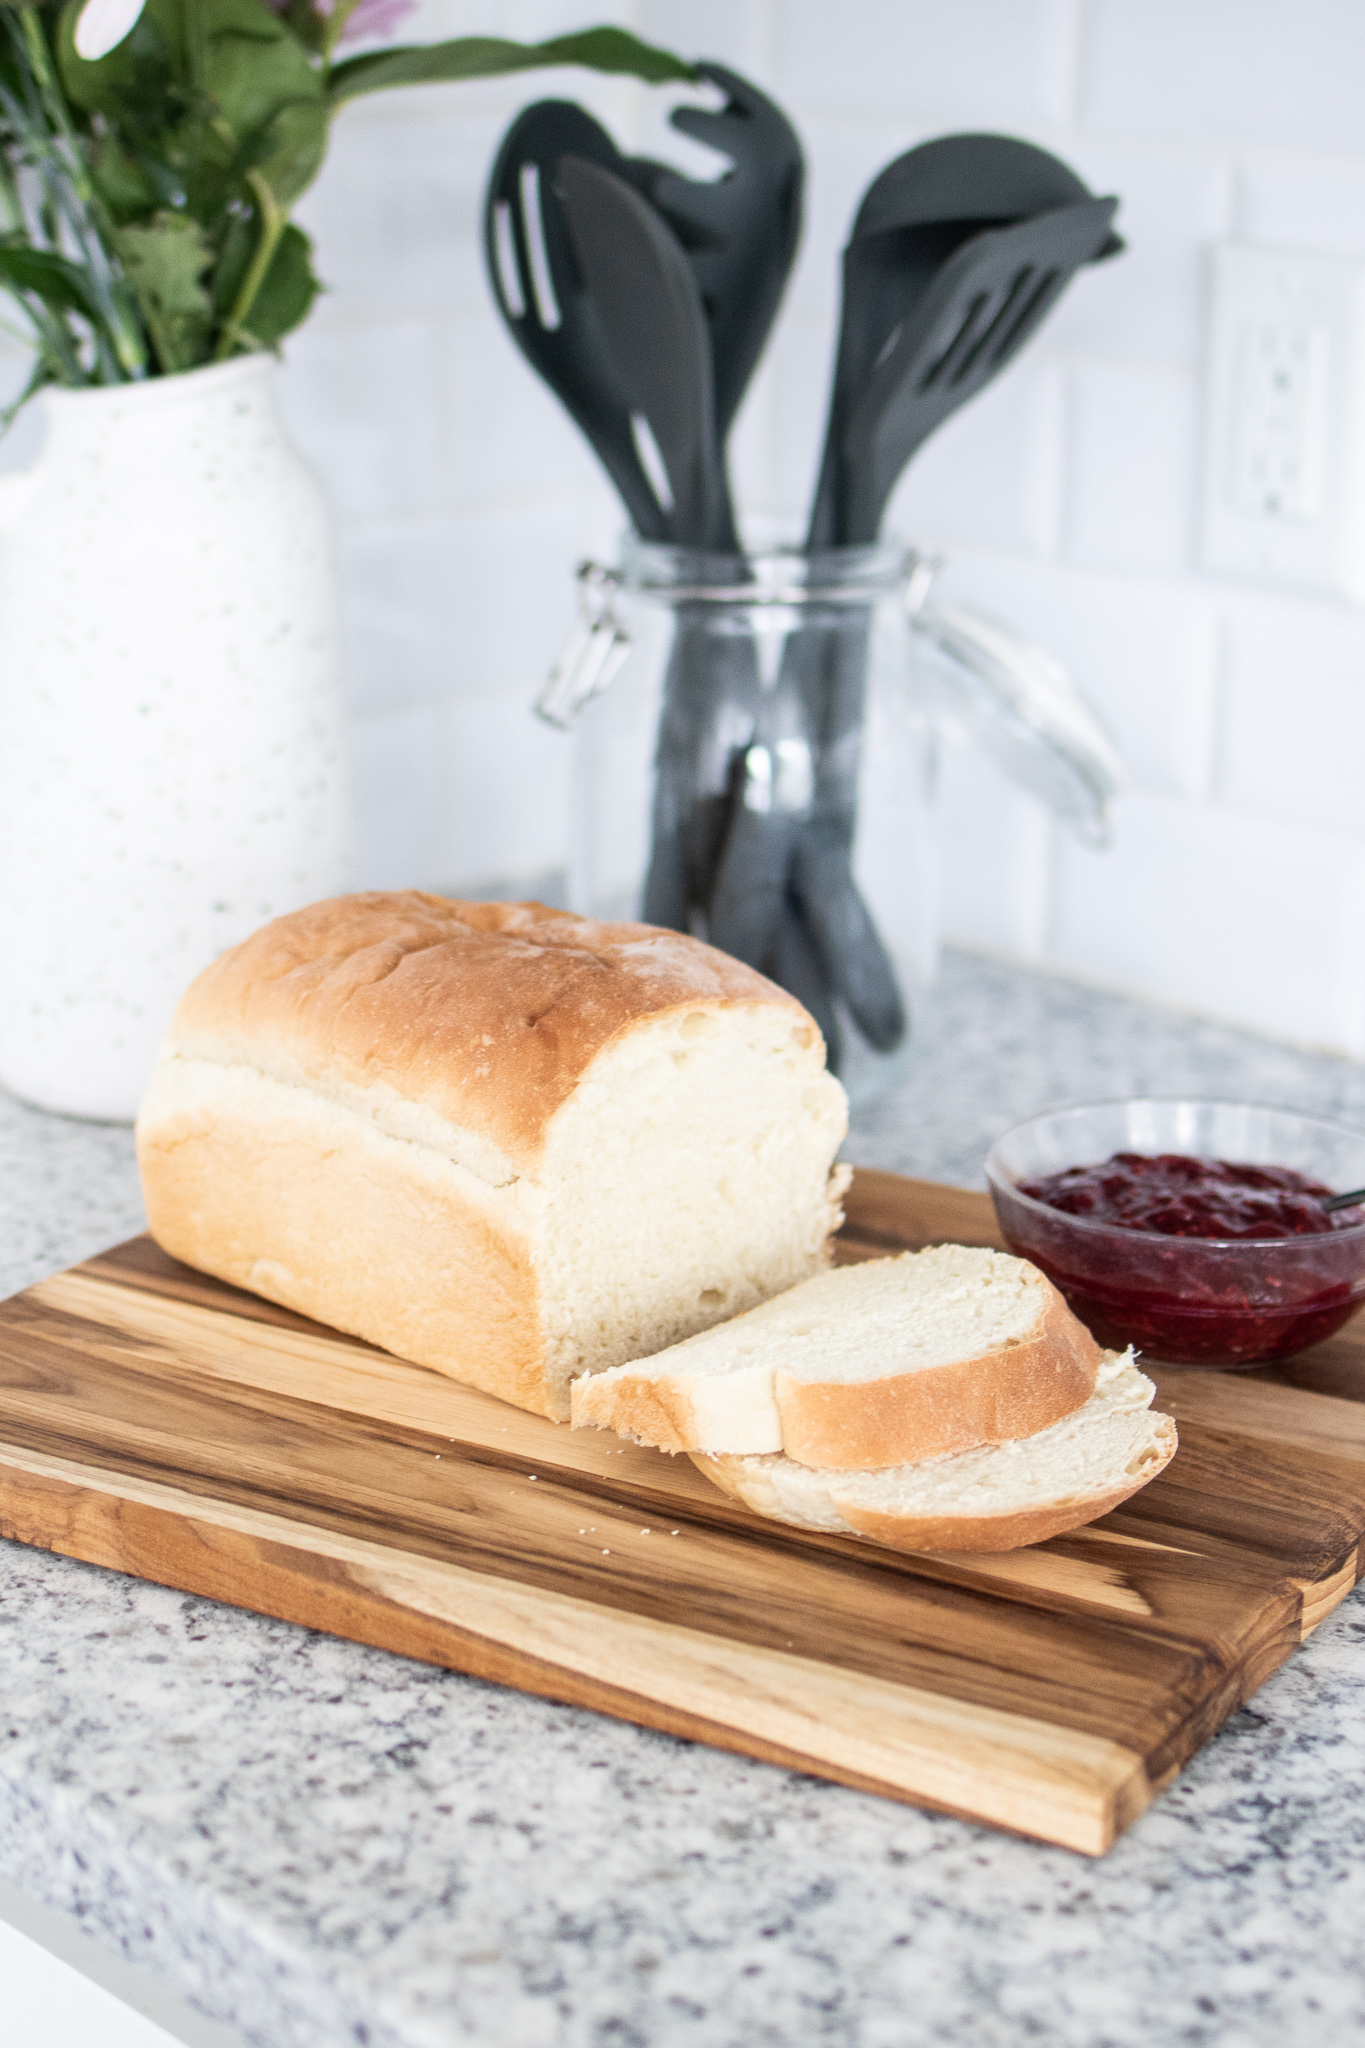
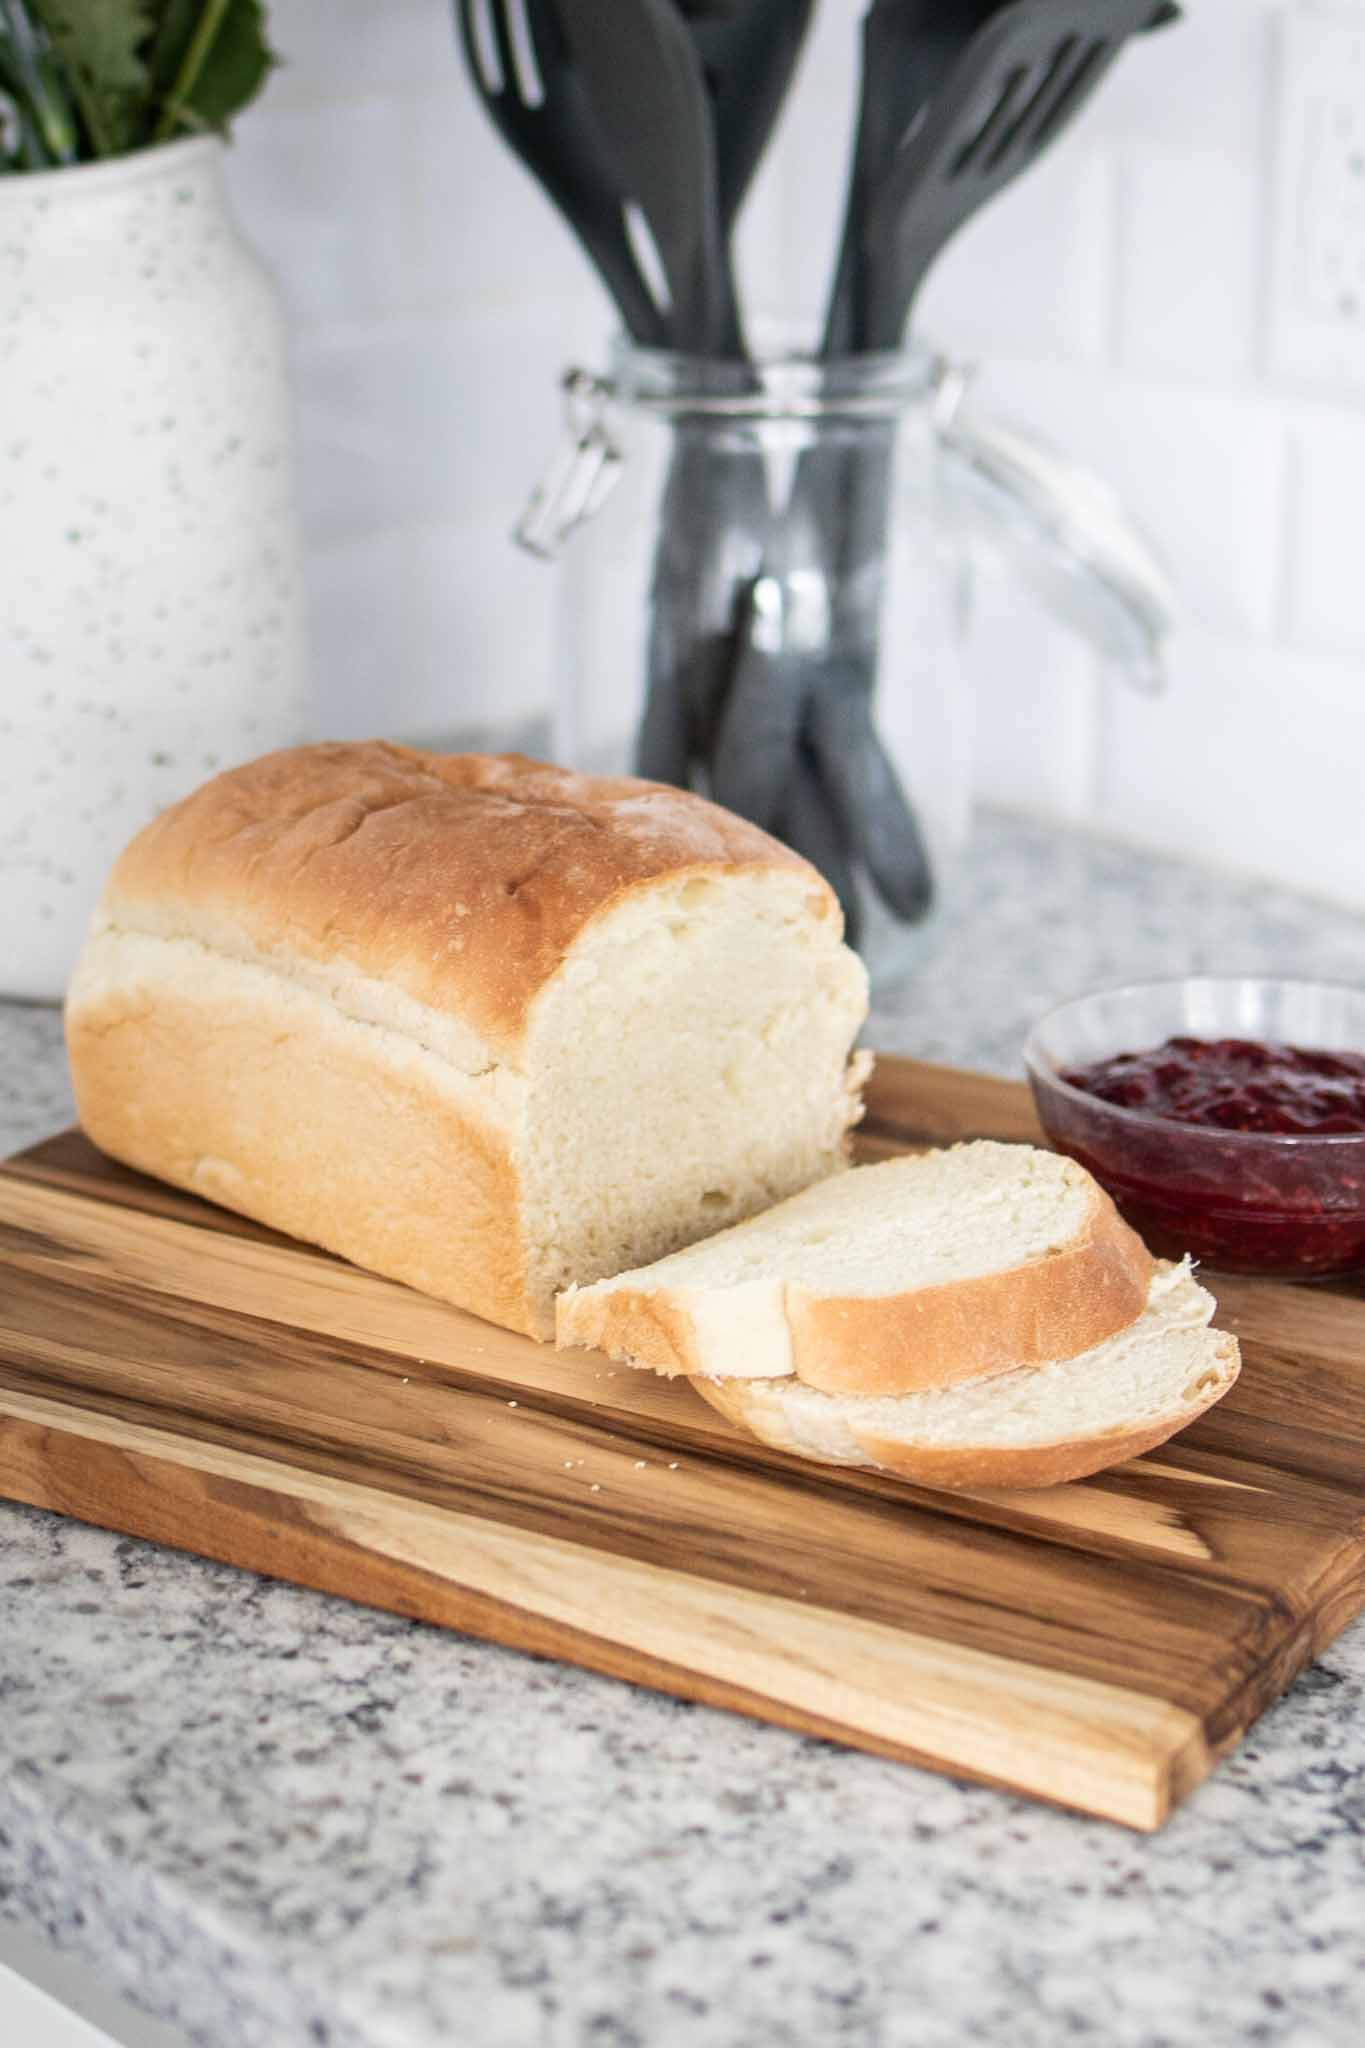
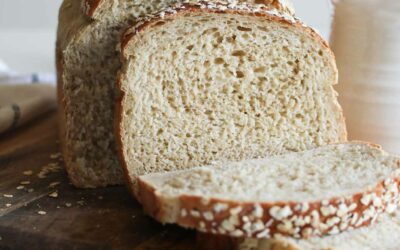
This classic white sandwich bread is unbelievably soft and works amazing for sandwiches, toast or as a praised addition to the dinner table.
This bread is the heart and soul of what I grew up on. My mom mostly stuck with the wheat version of this recipe (see recipe here), but this was still the bread the neighbors knew us by. I made several batches every single week and sold it to family friends and neighbors. Hundreds of loaves came through that simple kitchen and now to this day I can’t let too much time pass without having my hands in dough.
I’ve adapted the recipe slightly to make it a more manageable two loaf recipe and tweaked the moisture ratios to make it more high-altitude friendly. I usually make a batch every other week and use one loaf for that week, and freeze the other loaf for the following week. You can absolutely double this recipe if you’d like to make more at a time.
What makes this bread amazing
Simple ingredients – this bread doesn’t have any extra nonsense. You should have most everything, if not everything, already lying around.
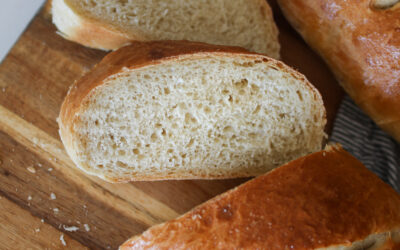
Simple texture – this bread is amazing for sandwiches, toast, and don’t even get me started with french toast. It also is so classic on its own to set on the table at dinner. Because we give it a triple rise, the gluten and proteins have time to work their magic and create a stunning crumb structure. No more dense, fallen, or holey bread.
Simple tools – you can use a machine mixer to take out some of the work of kneading, but if you don’t have one already, don’t fret! This is something that you can knead by hand. In fact, if this is your first time approaching bread, I encourage the “by hand” approach. There’s no better way to feel the dough and properly gauge how much flour you’re adding.
How to work with yeast
There are several different kinds of yeasts out there. None are necessarily bad, but they all respond differently so it’s important to know what you’re working with. There are 3 primary kinds of yeasts – active dry, instant, and rapid rise. For this recipe my favorites are either active dry or instant. Active dry needs to be activated prior to using by letting it sit in warm water with sugar (or honey) for 10 minutes until foamy. Instant has already been partially activated and you can let it get foamy first, or just add it to your recipe with a warm liquid and it’ll still continue activating like normal. For more information on this see my tips page on working with yeast.
Whatever yeast you use, two general key principles:
1. It’s best stored in the refrigerator or freezer for longest shelf life. I’ve heard a lot of people say “6 months” for the freezer once it’s been opened, but I’ve used my yeast past that point and it’s still worked great. One If you see your yeast isn’t activating, you could have killed it by using too hot of a liquid, or it could have gone bad if you’ve had it for a while.
2. You can kill your yeast by having your liquid component to hot! On the flip side, it won’t activate well if you put it in water. So what does yeast love? A nice warm bath. It’s true. If you need a specific number, I always recommend 110 degrees F. I recommend taking the temperature especially if you’re new to bread making because it can be the make or break of having successful results.
How to make perfect sandwich bread
I’ve broken down the process into 6 visual steps in hopes that it will be a helpful visual guide as you follow the detailed written instructions below. Additional images can be found in the wheat bread recipe here. The steps are identical.

STEP 1: Make the sponge. It may look slightly more or less wet depending on how much flour you add in initially. It’s okay that the look will vary. This rest is OPTIONAL.
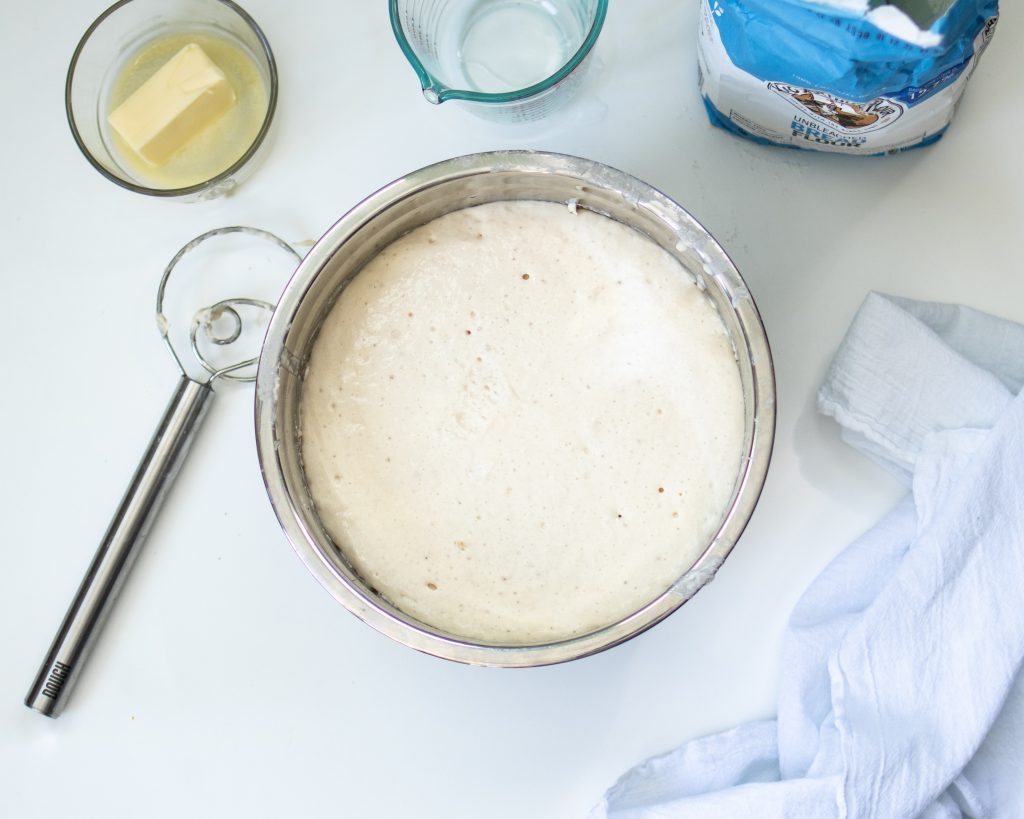
STEP 2: This is about what the sponge will look like after it’s risen. At this point you’ll slowly add in the rest of the ingredients and the sponge will naturally deflate as you mix it together.
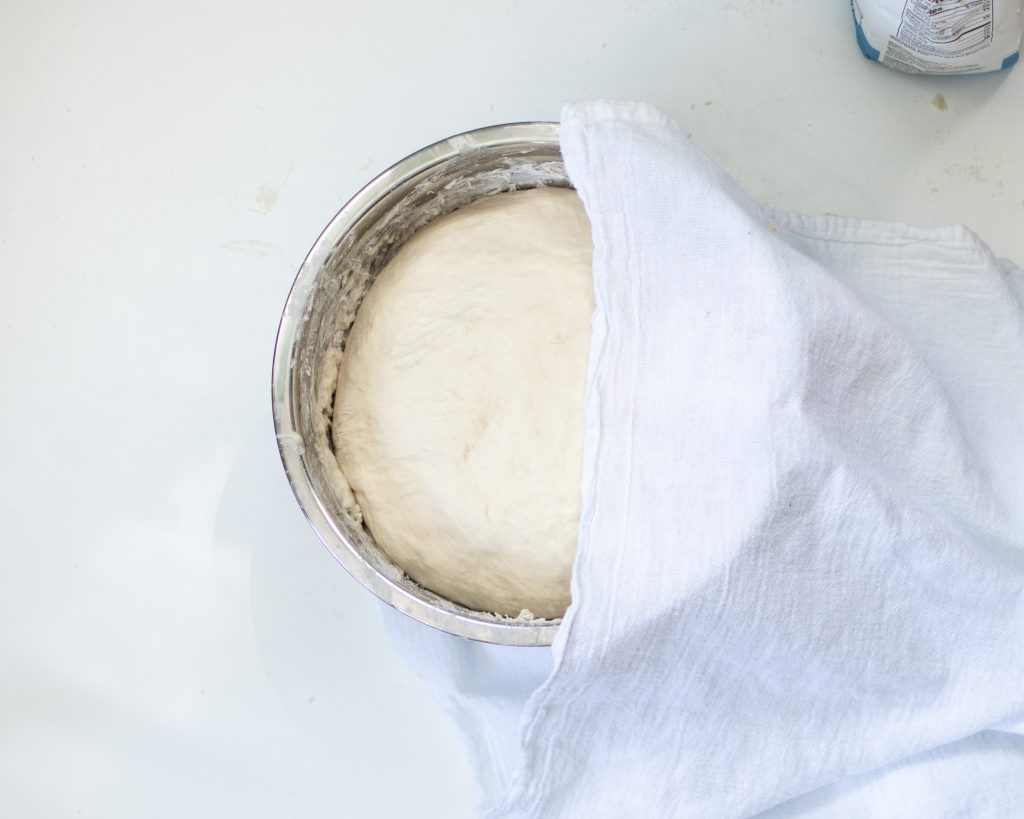
STEP 3: After you incorporate the remaining ingredients, knead the dough for about 10 minutes to activate the gluten. Then form it into a ball and put it back in the greased/floured bowl to rise.
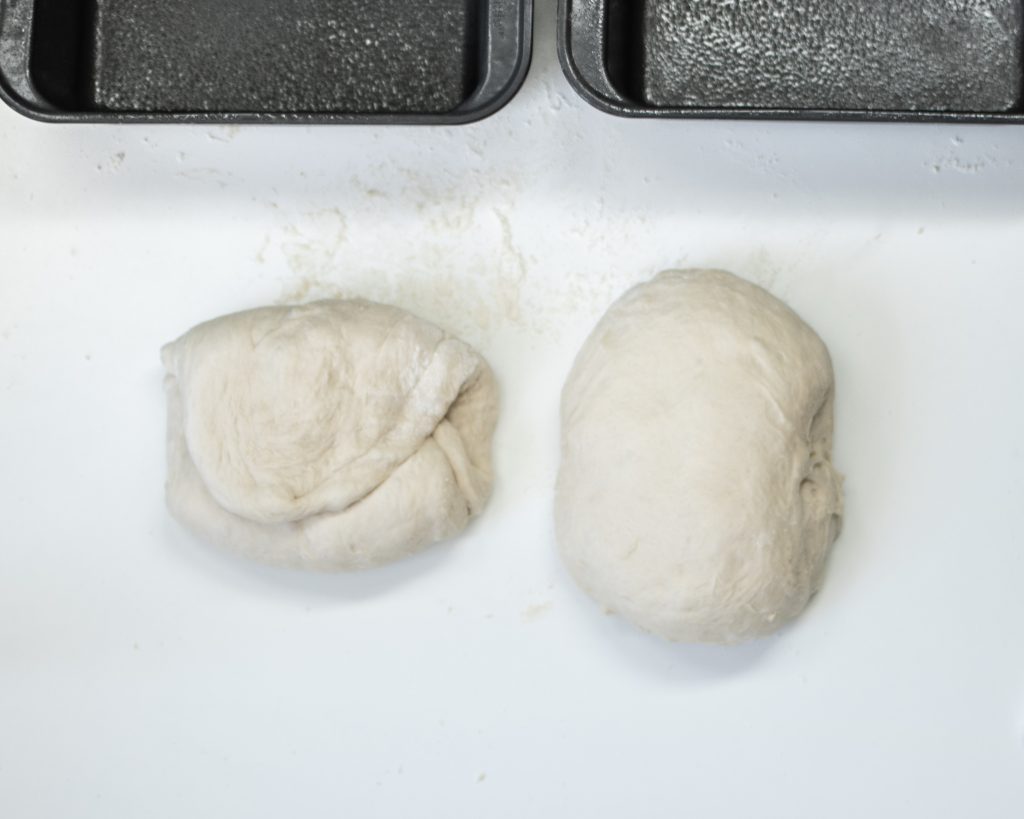
STEP 4: Split the dough into two even piles. Form into loaves. I first fold into thirds (like dough on left), then rolling up and pinching the seams, ensuring there are no air bubbles.
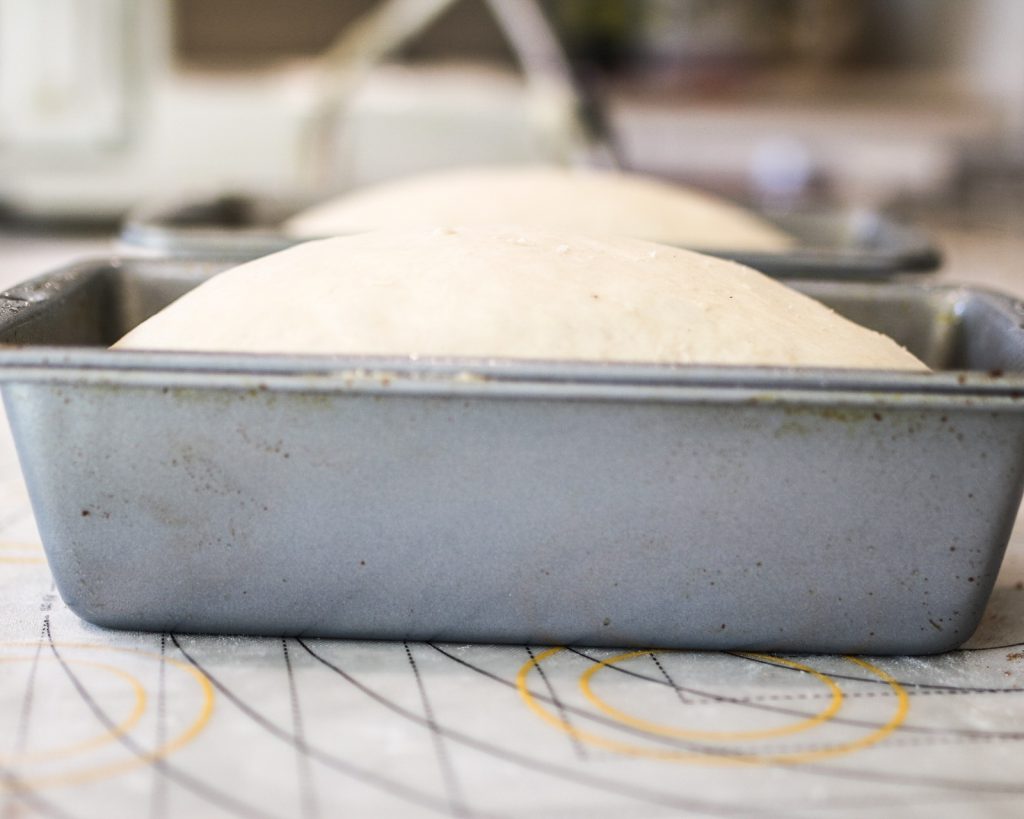
STEP 5: Place the formed loaves into sprayed 9×5 inch pans. Let rise in a warm, draft free place until loaves are just arched over the tops of the pans.
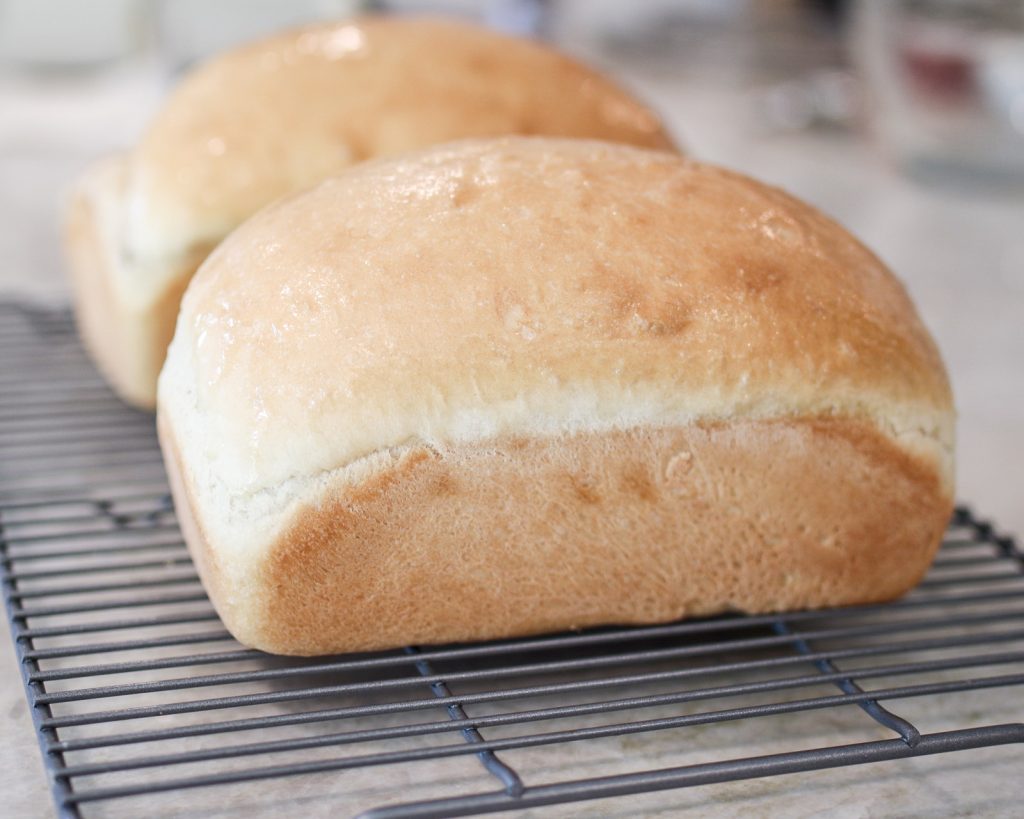
STEP 6: Bake for about 25 minutes, until bottoms are golden brown. Place on cooling racks. Brush the tops with butter while bread is warm.
Can I simplify the steps?
Yes! To achieve best results, I encourage you to follow all of the steps and rise times. Really, there isn’t a lot of hands on time, most of it is just waiting for the bread to rise where you can prep other ingredients or do other things around the house while you wait. HOWEVER, there are some days we just don’t have 3 hours. I get that. My mom (who I consider Queen of Sandwich Bread) does a one-rise approach, and her bread still turns out amazing. I’m just turning into a bread snob and prefer the extra fluff and rise if I have the time. So, what do I do if I want to keep it simple with a single rise?
Simplify the steps by cutting out the first and second rise. You will keep the same order of adding the ingredients (adding the hot water, yeast, and honey first). Slowly add the rest of the ingredients and knead for 10 minutes like normal. Form the loaves and let them rise in their pans (referred to as the third rise listed in the original instructions). Bake as directed.
As always, happy baking!
You may also love…
Classic White Sandwich Bread
Ingredients
- 2 ½ cups warm water about 110 degrees
- 1 ½ tbsp instant yeast *see yeast description above
- ⅓ cup raw honey or sugar
- ¼ cup unsalted butter, softened (or oil) + more for brushing
- 2 tsp sea salt
- About 7 cups bread flour*
Instructions
Create Sponge
- In a large bowl (or mixer with dough hook), mix together the water, yeast, honey, and 3 cups of flour. Mix well until combined. Cover with a clean sack cloth towel or sprayed plastic wrap and wait about 20 minutes, or until the mixture has almost doubled in size and looks “sponge-like”.
Create Dough
- Add 3 more cups of flour, salt, and butter to your sponge. It is normal for your sponge to “deflate” as you mix this together. Slowly incorporate the remaining flour in ½ cup increments. When the dough seems soft, not too sticky, and is gently pulling away from the sides of the bowl, it means you’ve added enough flour. Knead for 10 minutes. If you are kneading by hand: when the dough mixture becomes more difficult to stir and work with in the bowl (usually at about 5 – 5 ½ cups) I like to work in the rest of the flour by hand. Place the dough on a clean, floured work surface. Sprinkle a little flour on top of the dough and begin to knead. The quicker you work your hands, the less likely they are to stick. I like to knead by pulling in the corners of the dough with my fingers and then pressing down with heel of my hand, quickly and gently over and over again. While doing so, I continue to slowly add additional spoonfuls of flour. This will take about 10 minutes depending on how fast you knead. You know the dough is ready when it’s not too sticky, and very soft.
- After kneading, round out the dough into a ball; doesn’t have to be perfect. Grease or flour the bottom of a bowl, place dough in bowl, and cover. Let rise about 25-30 minutes, or until doubled in size.
Forming the Loaves
- Grease two 9×5 inch pans. Punch down the risen dough to release air bubbles. Dividethe dough in half. Gently work your dough into a thick rectangle (about 12×8) and fold into thirds. Roll it up, pinch the seams together, and gently throw your loaf on the work surface to release any last air bubbles. (There are many ways to form a loaf. Do what's comfortable and what works for you.)
- Place loaves in prepared pans, cover, and let rise again for about 30 minutes, or until thepeak of the loaf is just arching over the rim of the pan. The dough should be soft and more airy. When you poke the dough, the mark should just barely slowly come back. If it bounces back immediately, it needs more proofing time. While dough rises, preheat oven to 350°F. (I like 375°F for high altitude)
Bake
- Bake for about 25 minutes or until bottoms are golden brown. If the tops are browning too quickly, but still needs time to cook, you can cover tops with aluminum foil to slow down the browning.Transfer loaves to a cooling rack and generously lather the tops with butter while warm.
Notes
- To help dough rise quickly, place in a warm, draft free place. This is often my warm laundry room or closed oven door with the oven light on.
- The amount of flour you use and the baking temperature will vary due to the amount of humidity, temperature and brand of flour, and many other factors.
- Ensure your water isn’t too hot when combining with the yeast in the first step. If your bread is struggling to rise, it could be because the water was too hot and killed the yeast. You know your yeast is activated when it gets foamy within a couple minutes in the first step.

This is the easiest and BEST sandwich bread recipe I have ever made!!! It came together so easily and quickly and the texture, crumb, and taste was AMAZING! Believe it or not, I made these loaves about 3 weeks ago and I sealed both loaves tightly with plastic wrap and placed them in the fridge (I have no freezer space left) after making them and I now have only a few slices left and they are still as delicious as they were the first day I made them. All I do is toast the slices lightly and it’s as if I just baked the bread. What amazed me the most is the bread hasn’t changed taste, texture, and hasn’t gone bad or molded even after being made 3 weeks ago. It’s taken me that long to finish the bread only because I’m quarantined alone so I have no one else to share it with. Try this bread and I promise you will never use another sandwich bread recipe again!
Thank you Farah!! I loved hearing about your baking success! So glad this recipe worked so well for you. Keep baking!
If you were to make this recipe into mini loaves, how long would you bake them for?
Hi Mikenzie! My minis bake for about 18-20 minutes. I would watch your oven around 17 min to be safe and go up from there as every oven is different! Happy baking! 🙂
Ive been trying to make a delicious, perfect loaf of bread for years. I followed your instructions and guess what? It worked! It turned out perfectly and was so delicious! Thank you!
Now that I know I can…I can’t wait to make it again!
So glad it was a hit Alisa! Thanks for sharing!!
The BEST sandwich bread! We devour one load in about two days! This has become a weekend baking staple—I look forward to baking it all week, and it’s such a joy to make. I’m never buying packaged sandwich bread again!
Im so glad you enjoyed it! Thank you for sharing your success!
Wow, this was so good! Recipe was easy to follow and turned out perfectly! I made a regular loaf and then a cinnamon swirl loaf like your instagram video shows, turned out so good but I should have baked the cinnamon swirl loaf for a few more minutes. I live in Denver and am always nervous about my breads not turning out (after many failed attempts). This recipe worked great at my high altitude!!!
Thanks for sharing your experience Mikenzie!! So glad it turned out great!
WOW! The best bread! My first time ever making sandwich bread and I was scared it wouldn’t turn out- but it did! All of your recipes are amazing but this might be my favorite! So yummy! And your instructions are so clear and easy to read. Great layout- video etc. The video was really helpful for shaping the loaf since I had no idea how to do that haha. I will be making this all the time!
Yay! Glad you enjoyed making it! Thanks for taking the time to share. Keep baking! 🙂
WOWZA! This has become a staple in my house over the last many months. The instructions are well-written and easy to follow, and all those pictures are so helpful! My kids and I love making a batch every Monday and the two loaves don’t quite make it the full week. I keep thinking there is nothing better than bread and butter, then I make a sandwich, then toast and jam, then cinnamon and nutella, and it’s never-ending the amount of times I’ve said ‘nothing better than’…. It’s just gotta be this recipe. Nothing better than this recipe. Thank you Lo!
Easily the best sandwich bread I’ve ever made. It was perfect!!!!! I’ll never use another recipe again!
So glad it was a hit!! Thanks for taking the time to share your success!
Wow! This is my first time baking bread from scratch (and I’m pretty sure I messed up one of the steps haha!) but it still turned out DELICIOUS!!!
Thanks Lo for providing such a thorough, informative resource for newbies like me!
So glad you loved it! Thanks for taking the time to share your success!
I have never made sandwich bread before this recipe. The video tutorial makes it so easy and answers a lot of questions but first time bread bakers may have. I had a question and sweet Lo reply to me right away! I have made it two times in the last three days, My kids gobble it down!
This recipe is foolproof. Lori has yeast breads down to a science! I love that I can trust every recipe she puts out, that they will always turn out and taste absolutely amazing. There is no guesswork in her recipes, and she explains everything perfectly!
This bread is phenomenal! It is light and fluffy, but still hearty enough to hold up in a sandwich or toasted. It stays good for at least a week, but I guarantee it won’t last that long in any household! I’ve made it multiple times now and it has never failed. I have done it with both honey and white sugar with no changes in the final product. I bake it at 375 and live in Utah. I’ve always used all purpose flour and have never had any issues, so don’t let the bread flour scare you away! Love love love this recipe!!
Thank you for sharing your experience Lindsey!! Happy baking!
This bread is AMAZING. I’ve always been a little intimidated with making bread but this recipe is so good. The bread stays super soft for days. Other bread recipes I’ve tried are okay on the first day but get really dry as the days go on. This recipe gives me very soft and fluffy bread every time. I also loved the video tutorial Lo has on her Instagram where you can follow along.
Simply the best!
What’s 1 TB of yeast?
Only bread recipe I use. I also use a Pullman bread pan. Perfection!!
Yes, the pullman pans are the best, right?! Thanks so much for sharing! Glad you enjoy!!